A Complete Guide on How To Connect ADT Camera To WiFi?
The ADT security cameras are one of the most efficient, highly advanced, and reliable devices for home security. However, there are certain essential things that you would require to ensure the cameras’ optimal functioning, including a stable wifi network. So, if you want to learn How To Connect ADT Camera To WiFi through easy steps, read this guide. In this guide, you will learn the detailed steps for connecting the ADT camera to Wi-Fi. So, let’s unveil the complete process!
Key Things You’ll Need to Connect ADT Camera to WiFi
To begin with the ADT camera wifi configuration, you must have:
- An existing router (2.4 GHz)
- Correct web address
- Administrative details
- Valid SSID and password
- ADT Control app
- Smartphone/PC
- Ethernet cables, etc.
These are some of the main things you would require in this process. However, there are certain other requirements, such as a sufficient power supply, power adapters, cords, etc. Further, you must initiate the stepwise procedure to connect your ADT security device with the existing Wi-Fi network.
How To Connect ADT Camera To WiFi Step-by-Step?
After collecting the required things for the wifi setup, you must know How To Connect ADT Doorbell Camera To WiFi proficiently. Generally, you can connect your ADT camera to the wifi via the WPS mode or in the access point mode. Therefore, look beneath for the complete instructions to connect your ADT doorbell camera to the wifi:
Connecting the ADT camera to WiFi Via the WPS button method
- First of all, connect the AC power adapter to the camera and plug it into the power socket.
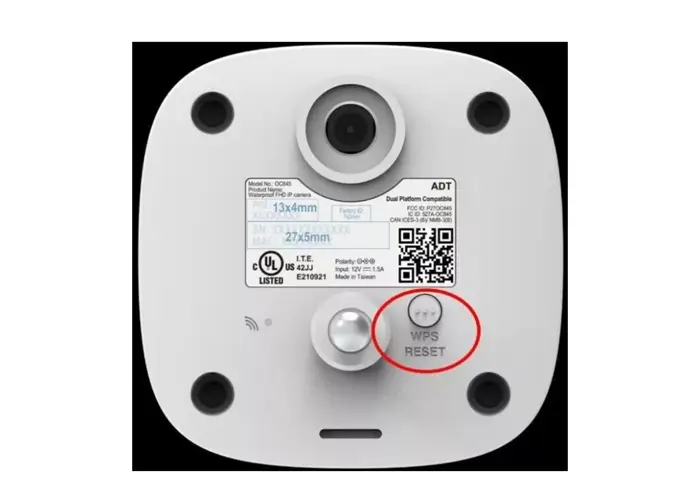
- Now, press and hold the reset button until the LED flashes blue.
- First of all, connect the AC power adapter to the camera and plug it into the power socket.
- Now, press and hold the reset button until the LED flashes blue.
- After that, find the WPS button on your wifi router.
- Next, press and hold down this button and the router tries to establish a wireless connection.
- Wait for a few seconds and you see a solid green LED on the router.
- This indicates the wifi connection is successful.
- Now, access your ADT camera account for further procedure.
How To Connect ADT Doorbell Camera To WiFi On AP Mode?
- Initially, power on your security device.
- Then, you see a flashing white LED on the camera.
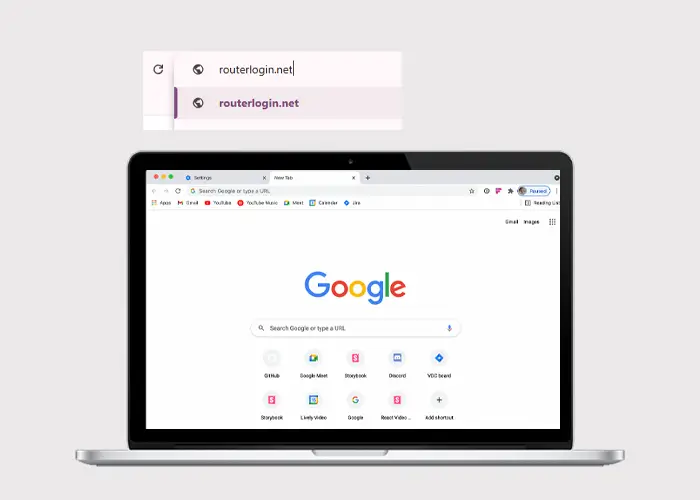
- Now, connect your computer to the router’s network.
- Further, open any web browser and type the 192.168.1.1 IP address in the URL bar.
- Next, log into your ADT camera account using valid details.
- Further, go to the dashboard and select ’AP Mode’ as the operation mode.
- Now, click on ‘Scan’ to detect the available wifi networks.
- Select a preferable wifi network name and enter its password.
- Then, tap on ‘Submit’ to apply these changes.
- Wait for the LED indicator on the camera and the wifi connection is established.
- Finally, follow the on-screen instructions to enroll your camera on the ADT interactive.
- Eventually, you have learned How To Connect ADT Camera To WiFi.
On the Whole
Finally, you have covered all the details regarding How To Connect ADT Camera To WiFi in this quick guide. Additionally, this guide also elaborates on the essential requirements to begin with the wifi configuration process. Surely, this guide helps you to connect your wireless ADT cameras to the wifi securely.